|
|
||
|
|
Adding users in Oracle databasesManaging users in Oracle databases is an important area of database administration. Without users, there can be no database change, and thus no need for a database.Creation of new users in Oracle or adding users to an existing database comprises many steps out of which the most important is specifying values for several parameters in the database. The question is what steps should be taken by the DBA to perform this function and what are the different types of users which exist in Database? In a database, there are various types of users which have different responsibilities and rights. The main categories are: Two user accounts are automatically created with the database and granted the DBA role. These two user accounts are:
When new users in Oracle are added, some rights are assigned to that user so that actions are performed on the database either directly or through roles. There are two types of privileges given to a user:
Various methods to add new users in a database are: CREATE USER user_name IDENTIFIED BY password; CREATE USER uwclass IDENTIFIED BY uwclass; CREATE USER user IDENTIFIED {BY password | [DEFAULT TABLESPACE tablespace]
To provide system privileges to the user, the DBA will perform the following: GRANT {system privilege [, ... ] } TO { { user | role | PUBLIC
} All users in Oracle are required to have the CREATE SESSION privilege in order to access the database. Each user must be granted the CREATE SESSION privilege either directly or through a role. System privileges can be granted by one user to other users when the user granting the privilege has the WITH ADMIN OPTION. 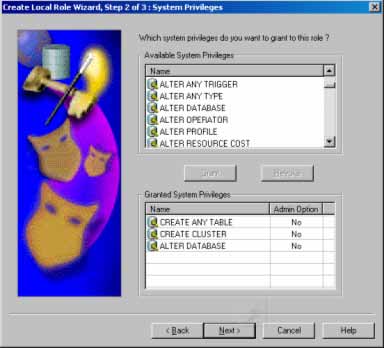 Object privileges allow a user to perform a specified action on a specific object. Other users can access user-owned objects by preceding the object name with the user name (username.object). Object privileges extend down to table columns. GRANT {object privilege [, ... ] | ALL [PRIVILEGES] } ON
[schema.] object GRANT {object privilege [, ... ] | ALL [PRIVILEGES] } [(column
[, ... ])] ON [schema.] object Only INSERT, UPDATE and REFERENCES privileges can be granted at the column level. To create users in Oracle whose authentication is done by the operating system or by password files, the DBA will use: Method 1: Step 1. Set the initSID.ora parameters as: remote_os_authent=TRUE os_authent_prefix = "OPS$" Step 2. Generate a new spfile CREATE spfile FROM pfile='initorabase.ora'; 3. Add the following to the sqlnet.ora sqlnet.authentication_services = (NTS) Method 2: Step 1: Connect as system/manager in SQL*Plus and create the Oracle user: CREATE USER ops$oracle IDENTIFIED EXTERNALLY; GRANT create session TO ops$oracle; Step 2: Create a user in the operating system named oracle if one does not already exist. Step 3: Go to command line (terminal window in UNIX, cmd in Windows. Type 'sqlplus' (without the single quotes). Method 3: Step 1: Connect as system/manager in SQL*Plus and create the Oracle user: CREATE USER "PC100USER" IDENTIFIED EXTERNALLY; where PC100 is the name of the client computer. Then GRANT CREATE SESSION TO "PC100USER"; Step 2: Create a user in Windows named USER. Step 3: Log on Windows as USER and go to the C: command line. The following methods for authenticating database administrators replace the CONNECT INTERNAL syntax provided with earlier versions of Oracle:
Depending on whether you wish to administer your database locally on the same machine where the database resides or to administer many different databases from a single remote client, the DBA can choose between operating system authentication or password files to authenticate database administrators. On most operating systems, OS authentication for database administrators involves placing the OS username of the database administrator in a special group or giving that OS username a special process right. The database uses password files to keep track of database usernames that have been granted administrator privileges. When the DBA grants SYSDBA or SYSOPER privileges to users in Oracle then that user's name and privilege information is added to a password file. If the server does not have an EXCLUSIVE password file, that is, if the initialization parameter REMOTE_LOGIN_PASSWORDFILE is NONE or SHARED then the DBA receives an error message if these privileges are attempted to be granted. A user's name only remains in the password file while that user has at least one of these two privileges. When the DBA revoke the last of these privileges from a user, that user is removed from the password file. To create a password file and add new users in Oracle to it,
|
Exclusive interviews with:
Free eBookSubscribe to my newsletter and get my ebook on Entity Relationship Modeling Principles as a free gift: What visitors say...
"I just stumbled accross your site looking for some normalization theory and I have to say it is fantastic.
Read more
Testimonials
I have been in the database field for 10+ years and I have never before come across such a useful site. Thank you for taking the time to put this site together." Mike, USA |
|
Theory & Practice DB Normalization Analysis Phase Database Keys DB Glossary Appl.Architecture Oracle DBA MySQL DBA SQL Server DBA Install Oracle Install SQL Server Proj.Management Oracle Constraint Programming Tips Database Normalization eBook: |
||
|
Copyright © www.databasedesign-resource.com /
All rights reserved. All information contained on this website is for informational purposes only. Disclaimer: www.databasedesign-resource.com does not warrant any company, product, service or any content contained herein. Return to top
The name Oracle is a trademark of Oracle Corporation. |
||